Upgrade from Windows XP to Windows 7 – Part 2
Now that you have Windows 7 installed on your computer, it’s time to restore your backed up files. You’ll also need to reinstall all of your programs that you want to continue using.
Install Essential Programs
Everyone has a different idea of what the “essential” programs are, so I’ll just give a rundown of my bare essentials.
| Adobe Reader | There are other PDF readers that are more lightweight and also free, but as little as I view PDFs, I don’t need the most lightweight and fast PDF reader. I just want one that works and is fully compatible with any PDFs I may download. In my experience, Adobe’s Reader is still the most reliable PDF reader. |
| Windows Security Essentials | AVG was my go-to free anti-virus program for years, but I like how well Windows Security Essentials integrates with Windows 7. It has done well in testing from the reviews I’ve read, and it stays updated regularly. |
| Firefox | This is the best browser for me. It offers tons of add-ons that add functionality such as Personas (a quick and easy way to change the theme, or “skin” of the browser), FoxyTunes (control your media player from the browser – great for listening to music while you browse), and Download Statusbar (view essential information about your downloads such as speed and time remaining, pause and resume, and open downloaded files from the status bar of your browser). Firefox also offers great security and performance when loading pages. |
| Steam | It’s like iTunes and Facebook for PC gaming. Create a profile, add friends, purchase games and download them anytime, anywhere, on any computer. Steam makes it easy to purchase games and play with friends. An achievement system allows games developers to provide additional incentives for gamers as well. |
| ImgBurn | This is a free application that allows you to burn ISO images or rip CDs and DVDs to ISO images. You can also write files on your computer to an ISO file or burn them directly to a CD or DVD. |
| 7-Zip | Not all compressed archives are in the .zip format. 7-Zip can open most archive formats, including .zip and .rar archives. |
| Notepad++ | This is Notepad on steroids. It offers a tabbed interface for working on multiple files as well as syntax highlighting for many file types, including HTML and CSS. |
All of these programs can be installed using a custom installer from Ninite.com. Ninite allows you to select the programs you want to install, then creates a custom installer for you to download. With a few clicks of your mouse it installs all of your selected programs using default settings without the need for user input. It automatically deselects toolbars and other “junk” software that is sometimes included with free software, so you don’t have to worry about cluttering up your computer.
To get started with Ninite, open your browser and go to Ninite.com. When the home page loads you can check the box next to each software program that you want to install.
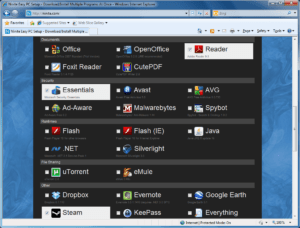
Once you have selected all of your programs, click on the Get Installer button.
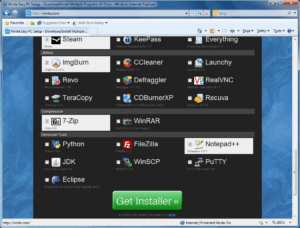
A new page will load, prompting you to download your custom installer. Click on the Save button to download the installer.
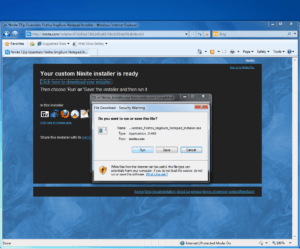
Once the installer is downloaded, run the file to install the programs. This process may take some time as the program will need to download additional files, but it is an unattended installation, so you won’t need to monitor the process.
Reinstall Your Other Software
At this point you’ll want to install any other software that you intend to use in Windows 7. This might include Microsoft Office, CD or DVD burning software, games, or any other programs that you use regularly. Gather the CDs and DVDs needed for these programs along with any license keys that will be needed, then install each program one at a time.
Tip: Some of your programs may need to be re-downloaded from the internet; if so, download the installation files before you begin installing your other programs. Some installations require that you restart your computer, which will interrupt your download.
Note: Now is a good time to think about what software you really need and use often, and what software you don’t really need. The fewer programs you install, the better your computer will run as a general rule.
Restore Backed Up Files
My Documents
In Windows XP, the My Documents folder contained sub-folders for My Music, My Pictures, My Videos, etc.. In Windows 7, the My Documents folder does not contain sub-folders for music, pictures, or videos. These folders are actually located alongside the My Documents folder in your user profile folder.
In Windows XP, your My Documents folder structure looked like this:
- Documents and Settings
- [your user profile name]
- My Documents
- My Music
- My Pictures
- My Videos
- [additional folders]
- My Documents
- [your user profile name]
In Windows 7, the folder structure looks like this:
- Users
- [your user profile name]
- My Documents
- My Music
- My Pictures
- My Videos
- [additional folders]
- [your user profile name]
Copy your music, pictures, videos, etc. from your backup into the corresponding folder in Windows 7. You want to make sure you do not create sub-folders in the My Documents folder in Windows 7.
Any files or folders from your My Document backup that do not have a corresponding location in Windows 7 should be copied into the My Documents folder in Windows 7.
Documents and Settings Folder
Windows 7 does not have a Documents and Settings folder. Instead it uses the Users folder. As in Windows XP, there is a hidden folder that contains files for your installed programs. You’ll need to change your folder options to show hidden files and folders.
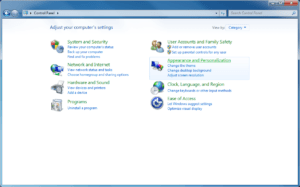
To view hidden files and folders in Windows 7, go to the Start menu > Control Panel and click on the Appearance and Personalization category.
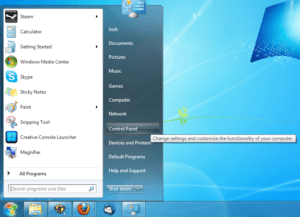
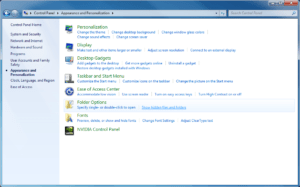
The click on the “Show hidden files and folders” link in the Folder Options category.
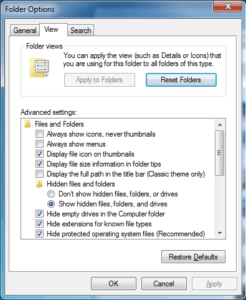
This will bring up the Folder Options window. In the View tab, choose the option to “Show hidden files, folders, and drives” and click OK.
The hidden folder you’re looking for in your user profile folder is called AppData, and it contains three sub-folders. Most of your files will be restored into the Roaming sub-folder.
Look for folder names in the Roaming folder that match the folder names in your backup and copy your files over. For example, if you use Firefox, there will be a Mozilla folder that you can copy your backed up Mozilla folder into. This will restore your saved passwords, bookmarks, and even add-ons that you had in your Windows XP installation.
Tip: You’ll want to make sure you have reinstalled all of your programs before you restore your backed up files to the Roaming folder to ensure that you get the folder names right.
Program Files
Windows 7 64-bit creates two Program Files folders – Program Files and Program Files (x86). If you backed up any files from your Program Files folder in Windows XP, you will most likely need to restore them to the Program Files (x86) folder in Windows 7, as that is where your 32-bit programs will be installed. The non-x86 folder is for 64-bit programs only. Unless you installed a 64-bit version of a software program that you used to run in 32-bit on Windows XP, you won’t need to backup files to this folder.
Saved Games
Just as in Windows XP, saved games in Windows 7 can be scattered all over your folder structure. Most likely they will need to be restored to the same location in Windows 7 that they were in Windows XP. Keep in mind that most of your games will be installed in the Program Files (x86) folder in Windows 7, so if the saved games were located under the Program Files folder in Windows XP, they will be under the Program Files (x86) folder in Windows 7.
Series: Upgrade from Windows XP to Windows 7
- Upgrade from Windows XP to Windows 7 – Part 1
- Upgrade from Windows XP to Windows 7 – Part 2