Install the Excel Connector for Force.com in Microsoft Excel 2010
My department uses Salesforce quite a bit, which is great because it provides an excellent platform for managing data. However, a lot of the data we use comes from other departments in the form of Excel spreadsheets (sound familiar to anyone?). In an ideal situation all of this data would be automagically shared between Salesforce, PeopleSoft, SharePoint, etc., but our various business systems aren’t that integrated.
To help expedite importing spreadsheet data into Salesforce, we use an Excel Add-In tool called Excel Connector for Force.com (it’s a bit out of date, but it still works very well for importing data). The installation isn’t all that difficult, but the instructions for it are not very clear and I find myself having to hunt around for the proper procedure every time I install it. For my own sanity’s sake, here are clear instructions for installing it on Microsoft Excel 2010:
- Download the Salesforce Office Toolkit 4.0.
- Open the zip file and run the installer.
- Download the Excel Connector from http://code.google.com/p/excel-connector/downloads/list. Be sure to grab the latest version (as of today it is sforce_connector_ee_1603.zip).
- Open the zip file and copy the
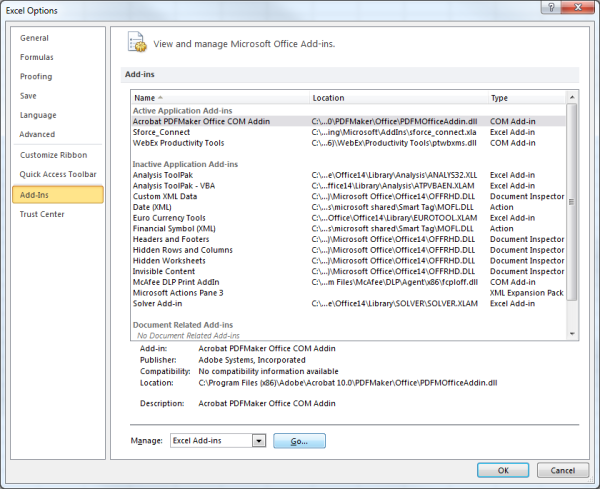
sforce_connect.xlafile into the Microsoft Office Add-Ins folder (on Windows 7 this is located at C:\Users\YOURUSERNAME\AppData\Roaming\Microsoft\AddIns\). - Open Excel 2010, go to File > Options > Add-Ins and click on the button near the bottom of the window.

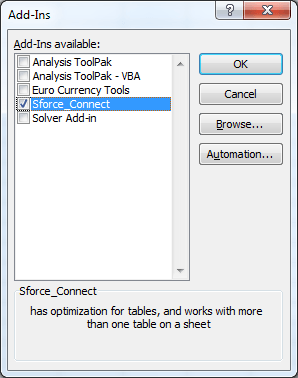
Enable the Excel Connector for Force.com from the Options > Add-Ins screen. - Check the box next to “Sforce_Connect” and click .

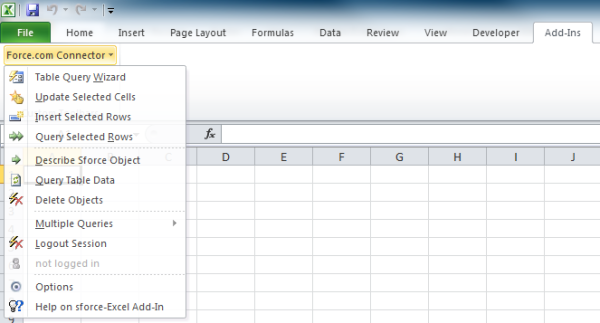
Check the box for “Sforce_Connect” to enable the Excel Connector for Force.com - You should now have a Force.com Connector button in the tab.
The Excel Connector is now installed and can be used to import/export data from Salesforce.

Comments
Comments are closed