Transfer iTunes Library and iPhone Data from Mac to PC
I recently built a PC for a friend of mine using some old parts I had lying around along with a few new components. She’s had an older Mac notebook running OS X v10.4 for a few years, but it’s just too slow and too old to run a lot of newer software or games, including the latest version of iTunes (which means she can’t update her iPhone to the latest iOS version).
Her new PC is running Windows 7 x64 Home Premium and the latest iTunes so it’s fully capable of keeping her iPhone updated. However, she can’t just plug her iPhone into the new computer without making sure that iTunes is set up properly and all of her purchased music/apps/etc. are on the PC to avoid losing those purchases. There are numerous tutorials on the web that cover transferring your iTunes music and iPhone data from PC to Mac. Unfortunately I couldn’t find any tutorials about transferring from Mac to PC, so I decided to write up a simple tutorial documenting the process we used.

There were a few steps involved in transferring the iTunes library from Mac to PC, but overall the process was fairly simple because all of her music was organized by iTunes (rather than being scattered across multiple folders on the hard drive). This article has instructions on organizing and consolidating music into the iTunes folder if your library is not already organized by iTunes (e.g. if you have music downloaded from amazon’s mp3 service or another music download service).
- First we opened iTunes on the new PC so it could create the default folder structure for iTunes (located in c:/Users/USERNAME/Music/iTunes in Windows 7).
- On the Mac, we opened the iTunes folder (located in ~/Music/iTunes) and copied everything in that folder to an external USB hard drive (formatted with the FAT32 file system so both Windows 7 and OS X can read/write to it).
- We then plugged the external USB hard drive into the PC and copied all of the Mac’s iTunes files and folders into the iTunes folder on the PC.
- We had to modify the XML file that iTunes uses for it’s library to use Windows file paths instead of OS X file paths. To do this, we opened the file
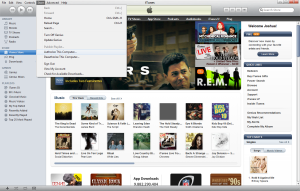
iTunes Music Library.xmlin Notepad and went to the Edit > Replace… menu. By entering “file://localhost/users” in the Find what field and “file://localhost/c:/users” in the Replace with field (we are basically just adding the drive letter for the hard drive in Windows), then clicking , the XML file was updated so that all file paths worked for Windows. - We then opened iTunes again and authorized her iTunes account for the new PC by going to Store > Authorize this computer… so it would work with all of her purchased content (songs, apps, etc.).
- Just in case, we plugged her iPhone into the Mac laptop and made a backup using iTunes on the Mac. We also synced all of her iPhone photos using iPhoto so we had a backup of those as well.
- Next we plugged the iPhone into the new PC. Windows installed the driver for it and it showed up in iTunes. We made another backup of the phone, performed a sync, and then updated her iPhone to the latest iOS version (4.02). iTunes displayed a few notifications about purchased content on the iPhone being absent from the library (she had purchased a few songs on her iPhone but we didn’t sync it with her old Mac iTunes library before we transferred the music, so the PC iTunes library didn’t have these new songs). iTunes conveniently let us copy the songs from her iPhone to the PC.
- Once her phone rebooted, we had a minor scare because all of her apps (other than the default apps) appeared to be gone. In reality they were all still there, but for some reason the iPhone inserted an empty screen between the home screen and the screen with her apps. When we scrolled to the second screen and it was blank we initially thought all the apps were gone. Once we scrolled to the third screen everything was where it was supposed to be. We also had a hiccup with her wireless network not letting her PC connect after the iPhone update (a quick reboot of her Airport router fixed this – just unplug it and plug it back in). I wonder if this has something to do with the new media streaming features of iOS.
That’s it! The important thing if you attempt this is to make a backup of your iPhone on your Mac first (just in case), copy all of the iTunes library files to the PC, and then authorize your iTunes account on the PC before you plug your iPhone or iPod into the PC for the first time. If you have any tips or question, post them in the comments!

Comments
Comments are closed