SharePoint, jQuery, and FullCalendar—Now with SPServices
Series: Building a Better SharePoint Calendar
- Display Events from a SharePoint Calendar Using jQuery and FullCalendar
- SharePoint, jQuery, and FullCalendar—Now with SPServices
⚠️ This was originally posted on November 18, 2011. The information may be outdated!
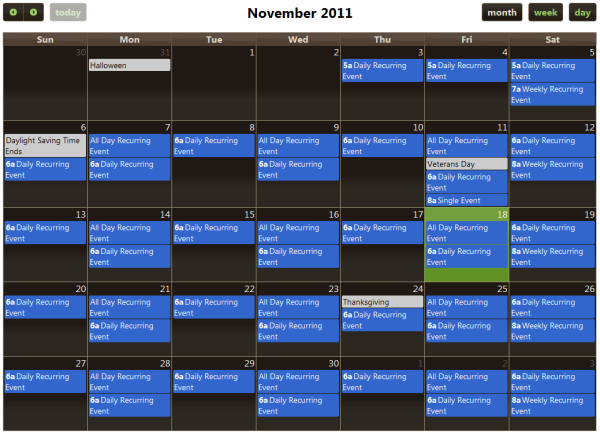
In the first entry to this series, I demonstrated how you can use a data view web part (DVWP) to emit SharePoint® calendar events as JSON that the FullCalendar jQuery plugin can use. Although it works fairly well, there are some limitations to the solution. It doesn’t handle recurring events, it doesn’t retrieve all events, it doesn’t support pagination/bookmarking, and it doesn’t provide a way to connect the calendar to Outlook® or create alerts.
This post will overcome the first two limitations by borrowing most of the code posted in this discussion thread on CodePlex and doing away with the DVWP altogether. Jim Bob Howard provided a lot of great information, but it’s broken up over several replies and is a bit difficult to follow. I also wanted to expand on the functionality of his solution by displaying events in the local time zone instead of the web server’s time zone and optimizing the web service calls by retrieving as few events at a time as possible instead of getting a month’s worth of events at a time.
Requirements
To make this work, load jQuery 1.6.4, SPServices 0.6.2, and FullCalendar (both the CSS and JavaScript files) 1.5.2. You can also include a jQuery UI theme, but it’s not necessary to get the solution to work (if you don’t use a jQuery UI theme, be sure you omit the theme: true option when initializing the calendar). I uploaded these files into a document library called “WebResources” at the root of the site collection, but they can be stored in any location that your users will have read access to. Then I loaded them on the page just after the <asp:Content ContentPlaceHolderId="PlaceHolderMain" runat="server"> line using SharePoint Designer (I prefer this over loading scripts in a CEWP, but that would work too).
<asp:Content ContentPlaceHolderId="PlaceHolderMain" runat="server">
<link rel="stylesheet" type="text/css" href="/WebResources/fullcalendar.css" />
<link rel="stylesheet" type="text/css" href="/WebResources/jquery-ui-1.8.16.custom.css" />

<script type="text/javascript" src="/WebResources/jquery-1.6.4.min.js"></script>
<script type="text/javascript" src="/WebResources/jquery-ui-1.8.16.custom.min.js"></script>
<script type="text/javascript" src="/WebResources/jquery.SPServices-0.6.2.min.js"></script>
<script type="text/javascript" src="/WebResources/fullcalendar.min.js"></script>
I built this solution using a SharePoint calendar list called “Calendar,” but it could be named anything; you’d just need to update the listName option in the SPServices function (I’ll get to that later).
Create a Container for the Calendar
This is the easiest part of the whole process. Create an empty <div> with an ID to load the calendar inside using a content editor web part (CEWP).
<div id="calendar">

	<!-- Calendar will be added here -->

</div><!-- #calendar -->
Select the Container and Apply the FullCalendar Plugin
Create a <script> block just after all of your other scripts and CSS files are loaded, and add the following code inside that <script> to apply FullCalendar to the container for the calendar when the page loads:
$(document).ready( function() {

	$( '#calendar' ).fullCalendar({

		// Assign buttons to the header of the calendar. See FullCalendar documentation for details.
		header: {
			left:'prev,next today',
			center: 'title',
			right: 'month, agendaWeek, agendaDay'
		},
		defaultView: "month", // Set the default view to month
		firstHour: "5", // Set the first visible hour in agenda views to 5 a.m.
		height: 720, // Set the height of the calendar in pixels
		weekMode: "liquid", // Only display the weeks that are needed
		theme: true, // Use a jQuery UI theme instead of the default fullcalendar theme
		editable: false, // Set the calendar to read-only; events can't be dragged or resized

		// Add events to the calendar. This is where the "magic" happens!
		events: function( start, end, callback ) {

			// Create an array to hold the events.
			var events = [];

		}
	});

});
At this point you should have a blank calendar on the page with no events. You can read through the Fullcalendar documentation for more details on the available options (the documentation is actually quite good), but for use in SharePoint the one option you want to make sure you include is weekMode.
By default, Fullcalendar displays six weeks in the month view to account for those 30 and 31 day months that start at the end of the week (check out October 2011 for an example). When you retrieve a month’s worth of events from SharePoint, the web service is smart enough to include events in the previous and next month that would be visible in the current month view, but it only retrieves them for the weeks that are needed (usually five weeks-worth of events). Therefore we’d have a sixth week on the calendar that wouldn’t be fully-populated with events. By setting weekMode to “liquid” or “variable” that sixth week won’t be rendered on the calendar unless it’s needed for a month that spans six weeks.
Retrieve All Calendar Events for the Current View
Next you need to give the calendar events to display. We’ll use SPServices to retrieve our calendar events based on the current calendar view. This is where Jim Bob’s solution really came through. By passing the appropriate CAMLQuery, CAMLViewFields, and CAMLOptions to the web service, it returns recurring events as separate, individual events. We’ll need to include a start date from which to retrieve our events for the <CalendarDate /> value and a date range for the <DateRangesOverlap /> value (either “<Week />” or “<Month />” in this case). The <CalendarDate /> value is used in the CAMLQuery and the CAMLOptions options, and the <DateRangesOverlap /> value is used in the CAMLQuery option.
I dug into Fullcalendar’s documentation a bit and discovered that I didn’t need to do the date and string manipulation in Jim Bob’s solution to set the start date from which to retrieve events. Fullcalendar provides a getView method that can retrieve the start date of the current month view (e.g. if the first visible date on the calendar is several days into the previous month, this will return the actual first day of the current month being viewed). This, combined with Fullcalendar’s formatDate() function, provides an easy way to set the startDate variable that will be used as the <CalendarDate /> value . Add this code after the events [] array:
// Set the date from which to pull events based on the first visible day in the current calendar view. For a month view, this will usually be several days into the previous month. We can use FullCalendar's built-in getView method along with the formatDate utility function to create a date string in the format that SharePoint requires. It must be in the format YYYY-MM-DDTHH:MM:SSZ. Due to time zone differences, we will omit everything after the day.
var startDate = $.fullCalendar.formatDate( $( '#calendar' ).fullCalendar( 'getView' ).start, "u" ).split( "T" )[0];
I also wanted the calendar to allow for view switching to the agendaWeek and agendaDay views in addition to the month view. Whenever you switch views or view a different day/week/month in Fullcalendar, it will retrieve the events for that view using SPServices. Once again you can use the getView method to retrieve the name of the current view. If the view is for a day or week, you can use <Week /> as the <DateRangesOverlap /> value; otherwise you can use <Month /> for the full month view (there is no <Day /> option, but <Week /> will work just fine for a day view). By setting things up this way, you’re minimizing the number of events that are being retrieved for each view (no need to get the entire month’s events when you’re just viewing a single day or week). Add this code right after setting the startDate variable:
// Get the current view of the calendar (agendaWeek, agendaDay, month, etc.). Then set the camlView to the appropriate value to pass to the web service. This way we will only retrieve events needed by the current view (e.g. the agendaWeek view will only retrieve events during the current week rather than getting all events for the current month).
var calView = $( '#calendar' ).fullCalendar( 'getView' ).title;
var camlView = "";

switch( calView ) {
	case "agendaWeek":
		camlView = "<Week />";
		break;
	case "agendaDay":
		camlView = "<Week />";
		break;
	default: // Default to month view
		camlView = "<Month />";
}
Now that the startDate and camlView variables are set, you can build out the CAMLQuery, CAMLViewFields, and CAMLOptions as string variables to use in the SPServices function. This makes things a bit easier to read. You can modify these if you want to filter your events beyond just the current view’s date range (check out this post for some useful CAML resources if you want to look into additional filtering). Add this code right after the previous code block:
// Set the camlFields, camlQuery, and camlOptions to the appropriate values to pass to the web service. You can add additional <ViewFields /> or adjust the CAML query if you have some custom columns that you want to filter by or display data from. The values below are the pretty much the minimum you'll want to start from to get it working.
var camlFields = "<ViewFields><FieldRef Name='Title' /><FieldRef Name='EventDate' /><FieldRef Name='EndDate' /><FieldRef Name='Location' /><FieldRef Name='Description' /><FieldRef Name='fRecurrence' /><FieldRef Name='RecurrenceData' /><FieldRef Name='RecurrenceID' /><FieldRef Name='fAllDayEvent' /></ViewFields>";
var camlQuery = "<Query><CalendarDate>" + startDate + "</CalendarDate><Where><DateRangesOverlap><FieldRef Name='EventDate' /><FieldRef Name='EndDate' /><FieldRef Name='RecurrenceID' /><Value Type='DateTime'>" + camlView + "</Value></DateRangesOverlap></Where><OrderBy><FieldRef Name='EventDate' /></OrderBy></Query>";
var camlOptions = "<QueryOptions><CalendarDate>" + startDate + "</CalendarDate><RecurrencePatternXMLVersion>v3</RecurrencePatternXMLVersion><ExpandRecurrence>TRUE</ExpandRecurrence><DateInUtc>TRUE</DateInUtc></QueryOptions>";
I made one significant addition to the CAMLOptions that Jim Bob did not use—I included the <DateInUtc>TRUE</DateInUtc> option, which retrieves the dates in universal coordinated time (UTC) rather than the local time zone of the web server. This allows me to use JavaScript to display events in the browser’s local time zone. If you’d prefer to display events using the server’s time zone, you can omit this, but you’ll also need to modify some additional code from my solution in the SPServices completefunc().
Next make a web service call using SPServices and the “GetListItems” operation. This is where you’d need to change the listName option to match your calendar’s list name or GUID. You can also use a calendar on a different site (but in the same site collection) by including a webURL option with the path to the alternate site:
// Make the web service call to retrieve events.
$().SPServices({
	operation: "GetListItems",
	async: false,
	listName: "Calendar", // Change this to the GUID or display name of your calendar. If the calendar is on a different site, you can use the display name with the webURL option (see SPServices.CodePlex.com for more information).
	CAMLViewFields: camlFields,
	CAMLQuery: camlQuery,
	CAMLQueryOptions: camlOptions,
	completefunc: function( xData, Status ) {

	}
});
The completefunc() is where you push the event data into the events array for Fullcalendar. The function loops through all of the events, checking if an event is all day. If it is, the function sets the thisADE variable to true and sets the thisStart and thisEnd variables to the UTC date strings from SharePoint (time zones are irrelevant for all day events, so there’s no need to convert them to the local time zone). If not, the thisADE variable will remain false and the function will need to convert the UTC date/time from SharePoint into the local date/time for the thisStart and thisEnd variables. Put this code inside the completefunc():
$( xData.responseXML ).find( '[nodeName="z:row"]' ).each( function() {

	// Check for all day events
	var fADE = $( this ).attr( 'ows_fAllDayEvent' );
	var thisADE = false;
	var thisStart;
	var thisEnd;
	if ( typeof fADE !== "undefined" && fADE !== "0" ) {
		thisADE = true;
		// Get the start and end date/time of the event. FullCalendar will parse date strings in local time automagically, and we don't need to do any local time conversions for all day events, so we can use the UTC date strings from SharePoint without converting them to local time.
		var thisStart = $( this ).attr( 'ows_EventDate' );
		var thisEnd = $( this ).attr( 'ows_EndDate' );
	}
	else {
		// Get the start and end date/time of the event. FullCalendar will parse date strings in local time automagically, so we need to convert the UTC date strings from SharePoint into local time. The formatDateToLocal() function above will take care of this. See comments in that function for more information.
		var thisStart = formatDateToLocal( $( this ).attr( 'ows_EventDate' ) );
		var thisEnd = formatDateToLocal( $( this ).attr( 'ows_EndDate' ) );
	}
});
I initially tried to use Fullcalendar’s built-in date formatting functions to convert the date/time to the local time zone, but unfortunately they didn’t do the trick (although I admit that I might have missed something with them). Therefore I created a function called formatDateToLocal() that will perform the date conversions needed for the thisStart and thisEnd variables. The function accepts either a date string in the yyyy-mm-ddThh:mm:ssZ format that SharePoint outputs or a JavaScript date object. I won’t explain how this function works in detail for this article, but I may for a future article.
To use the formatDateToLocal() function, put this at the top of the <script> block before the $(document).ready() function:
// Format UTC dates as local date/time strings.
function formatDateToLocal( date ) {

	var dateUTC;

	if ( typeof date === "string" ) {

		// Convert UTC string to date object
		var d = new Date();
		var year = date.split('-')[0];
		var month = date.split('-')[1] - 1;
		var day;
		var hour;
		var minute;
		var second;
		day = date.split('-')[2].split('T')[0];
		hour = date.split('T')[1].split(':')[0];
		minute = date.split('T')[1].split(':')[1].split(':')[0];
		second = date.split('T')[1].split(':')[2].split('Z')[0];
		dateUTC = new Date( Date.UTC( year, month, day, hour, minute, second ) );
	}
	else if ( typeof date === "object" ) {
		dateUTC = date;
	}
	else {
		alert( "Date is not a valid string or date object." );
	}

	// Create local date strings from UTC date object
	var year = "" + dateUTC.getFullYear();
	var month = "" + ( dateUTC.getMonth() + 1 ); // Add 1 to month because months are zero-indexed.
	var day = "" + dateUTC.getDate();
	var hour = "" + dateUTC.getHours();
	var minute = "" + dateUTC.getMinutes();
	var second = "" + dateUTC.getSeconds();

	// Add leading zeros to single-digit months, days, hours, minutes, and seconds
	if ( month.length < 2 ) {
		month = "0" + month;
	}
	if ( day.length < 2 ) {
		day = "0" + day;
	}
	if ( hour.length < 2 ) {
		hour = "0" + hour;
	}
	if ( minute.length < 2 ) {
		minute = "0" + minute;
	}
	if ( second.length < 2 ) {
		second = "0" + second;
	}

	var localDateString = year + "-" + month + "-" + day + "T" + hour + ":" + minute + ":" + second;

	return localDateString;
}
Note: If you aren’t retrieving the dates in UTC format so that you can instead display them using the web server’s time zone (or in the time zone that your user’s regional settings are set to), this function is not needed, and you shouldn’t include <DateInUtc>TRUE</DateInUtc> in the CAMLOptions. In that case you should also modify the above code to this instead:
$( xData.responseXML ).find( '[nodeName="z:row"]' ).each( function() {

	// Check for all day events
	var fADE = $( this ).attr( 'ows_fAllDayEvent' );
	var thisADE = false;
	var thisStart = $( this ).attr( 'ows_EventDate' );
	var thisEnd = $( this ).attr( 'ows_EndDate' );
	if ( typeof fADE !== "undefined" && fADE !== "0" ) {
		thisADE = true;
	}
});
Now that thisADE, thisStart, and thisEnd are set, the function just needs to get the event title, ID, and description (actually, you don’t need the description, but I’m retrieving it anyway because I will probably use it for a tooltip or something similar when hovering over the event in a future enhancement).
The ID changes format based on the type of event. If it’s a single, non-recurring event, it will just include the list item ID. If it’s a recurring event, the ID will include the list item ID, the number “0,” and the date/time of the recurrence in UTC format. These three items will be separated by “;#” in SharePoint 2007 and by “.” in SharePoint 2010. You can use some string manipulation to parse out that information depending on the type of event and format it so it’s usable as the ID query string parameter when generating the URL to view the event details. This code should immediately follow the if...else block that sets the thisStart and thisEnd variables.
// Get the list item ID and recurrence date if present. This will be used to generate the ID query string parameter to link to the event (or the specific instance of a recurring event). The ID query string parameter must be in the format "ID.0.yyyy-MM-ddTHH:mm:ssZ" for recurring events (where "ID" is the list item ID for the event). Event ID's are returned as just a number (for non-recurring events) or several numbers separated by ";#" in 2007 or "." in 2010 to indicate individual instances of recurring events. By splitting and joining the ID this way, thisID will be set to a valid query string parameter whether an event is recurring or not for both versions of SharePoint.
var thisID = $( this ).attr( 'ows_ID' ).split( ';#' ).join( '.' );

// FullCalendar documentation specifies that recurring events should all have the same id value when building the events array (the id is optional, but I'm including it for completeness). We can get the list item ID (which is the same for all instances of recurring events) without the recurrence information by simply splitting thisID.
var eventID = thisID.split( '.' )[0];

// Get the event title. This is displayed on the calendar along with the start time of the event.
var thisTitle = $( this ).attr( 'ows_Title' );

// Get the event description. I don't use it in this example, but you could use it for something, perhaps as a tooltip when hovering over the event.
var thisDesc = $( this ).attr( 'ows_Description' );
Next, you need to push all of this information into the events array along with the URL to view the event. I’m also including a Source parameter that brings the user back to the current page, but you could omit that if the default view for the calendar is set to the page that Fullcalendar is being used on. Place this code after the previous code block.
// Add the event information to the events array so FullCalendar can display it.
events.push({
	title: thisTitle,
	id: eventID,
	start: thisStart,
	end: thisEnd,
	allDay: thisADE,

	// Adjust this URL to link to the display form for your calendar events. You can include a Source parameter to allow users to easily return to the FullCalendar page.
	url: '/Lists/Calendar/DispForm.aspx?ID=' + thisID + '&Source=' + window.location,
	description: thisDesc
});
Finally, you need to call Fullcalendar’s callback() function with the array of events. Add this code right before the closing } of the completefunc():
callback( events );The Full Code
Here is the <script> block in its entirety.
// Format UTC dates as local date/time strings.
function formatDateToLocal( date ) {

	var dateUTC;

	if ( typeof date === "string" ) {

		// Convert UTC string to date object
		var d = new Date();
		var year = date.split('-')[0];
		var month = date.split('-')[1] - 1;
		var day;
		var hour;
		var minute;
		var second;
		day = date.split('-')[2].split('T')[0];
		hour = date.split('T')[1].split(':')[0];
		minute = date.split('T')[1].split(':')[1].split(':')[0];
		second = date.split('T')[1].split(':')[2].split('Z')[0];
		dateUTC = new Date( Date.UTC( year, month, day, hour, minute, second ) );
	}
	else if ( typeof date === "object" ) {
		dateUTC = date;
	}
	else {
		alert( "Date is not a valid string or date object." );
	}

	// Create local date strings from UTC date object
	var year = "" + dateUTC.getFullYear();
	var month = "" + ( dateUTC.getMonth() + 1 ); // Add 1 to month because months are zero-indexed.
	var day = "" + dateUTC.getDate();
	var hour = "" + dateUTC.getHours();
	var minute = "" + dateUTC.getMinutes();
	var second = "" + dateUTC.getSeconds();

	// Add leading zeros to single-digit months, days, hours, minutes, and seconds
	if ( month.length < 2 ) {
		month = "0" + month;
	}
	if ( day.length < 2 ) {
		day = "0" + day;
	}
	if ( hour.length < 2 ) {
		hour = "0" + hour;
	}
	if ( minute.length < 2 ) {
		minute = "0" + minute;
	}
	if ( second.length < 2 ) {
		second = "0" + second;
	}

	var localDateString = year + "-" + month + "-" + day + "T" + hour + ":" + minute + ":" + second;

	return localDateString;
}

$(document).ready( function() {

	$( '#calendar' ).fullCalendar({

		// Assign buttons to the header of the calendar. See FullCalendar documentation for details.
		header: {
			left:'prev,next today',
			center: 'title',
			right: 'month, agendaWeek, agendaDay'
		},
		defaultView: "month", // Set the default view to month
		firstHour: "5", // Set the first visible hour in agenda views to 5 a.m.
		height: 720, // Set the height of the calendar in pixels
		weekMode: "liquid", // Only display the weeks that are needed
		theme: true, // Use a jQuery UI theme instead of the default fullcalendar theme
		editable: false, // Set the calendar to read-only; events can't be dragged or resized

		// Add events to the calendar. This is where the "magic" happens!
		events: function( start, end, callback ) {

			// Create an array to hold the events.
			var events = [];

			// Set the date from which to pull events based on the first visible day in the current calendar view. For a month view, this will usually be several days into the previous month. We can use FullCalendar's built-in getView method along with the formatDate utility function to create a date string in the format that SharePoint requires. It must be in the format YYYY-MM-DDTHH:MM:SSZ. Due to time zone differences, we will omit everything after the day.
			var startDate = $.fullCalendar.formatDate( $( '#calendar' ).fullCalendar( 'getView' ).start, "u" ).split( "T" )[0];

			// Get the current view of the calendar (agendaWeek, agendaDay, month, etc.). Then set the camlView to the appropriate value to pass to the web service. This way we will only retrieve events needed by the current view (e.g. the agendaWeek view will only retrieve events during the current week rather than getting all events for the current month).
			var calView = $( '#calendar' ).fullCalendar( 'getView' ).title;
			var camlView = "";

			switch( calView ) {
				case "agendaWeek":
					camlView = "<Week />";
					break;
				case "agendaDay":
					camlView = "<Week />";
					break;
				default: // Default to month view
					camlView = "<Month />";
			}

			// Set the camlFields, camlQuery, and camlOptions to the appropriate values to pass to the web service. You can add additional <ViewFields /> or adjust the CAML query if you have some custom columns that you want to filter by or display data from. The values below are the pretty much the minimum you'll want to start from to get it working.
			var camlFields = "<ViewFields><FieldRef Name='Title' /><FieldRef Name='EventDate' /><FieldRef Name='EndDate' /><FieldRef Name='Location' /><FieldRef Name='Description' /><FieldRef Name='fRecurrence' /><FieldRef Name='RecurrenceData' /><FieldRef Name='RecurrenceID' /><FieldRef Name='fAllDayEvent' /></ViewFields>";
			var camlQuery = "<Query><CalendarDate>" + startDate + "</CalendarDate><Where><DateRangesOverlap><FieldRef Name='EventDate' /><FieldRef Name='EndDate' /><FieldRef Name='RecurrenceID' /><Value Type='DateTime'>" + camlView + "</Value></DateRangesOverlap></Where><OrderBy><FieldRef Name='EventDate' /></OrderBy></Query>";
			var camlOptions = "<QueryOptions><CalendarDate>" + startDate + "</CalendarDate><RecurrencePatternXMLVersion>v3</RecurrencePatternXMLVersion><ExpandRecurrence>TRUE</ExpandRecurrence><DateInUtc>TRUE</DateInUtc></QueryOptions>";

			// Make the web service call to retrieve events.
			$().SPServices({
				operation: "GetListItems",
				async: false,
				listName: "Calendar", // Change this to the GUID or display name of your calendar. If the calendar is on a different site, you can use the display name with the webURL option (see SPServices.CodePlex.com for more information).
				CAMLViewFields: camlFields,
				CAMLQuery: camlQuery,
				CAMLQueryOptions: camlOptions,
				completefunc: function( xData, Status ) {
					$( xData.responseXML ).find( '[nodeName="z:row"]' ).each( function() {

						// Check for all day events
						var fADE = $( this ).attr( 'ows_fAllDayEvent' );
						var thisADE = false;
						var thisStart;
						var thisEnd;

						if ( typeof fADE !== "undefined" && fADE !== "0" ) {
							thisADE = true;
							// Get the start and end date/time of the event. FullCalendar will parse date strings in local time automagically, and we don't need to do any local time conversions for all day events, so we can use the UTC date strings from SharePoint without converting them to local time.
							var thisStart = $( this ).attr( 'ows_EventDate' );
							var thisEnd = $( this ).attr( 'ows_EndDate' );
						}
						else {
							// Get the start and end date/time of the event. FullCalendar will parse date strings in local time automagically, so we need to convert the UTC date strings from SharePoint into local time. The formatDateToLocal() function above will take care of this. See comments in that function for more information.
							var thisStart = formatDateToLocal( $( this ).attr( 'ows_EventDate' ) );
							var thisEnd = formatDateToLocal( $( this ).attr( 'ows_EndDate' ) );
						}

						// Get the list item ID and recurrence date if present. This will be used to generate the ID query string parameter to link to the event (or the specific instance of a recurring event). The ID query string parameter must be in the format "ID.0.yyyy-MM-ddTHH:mm:ssZ" for recurring events (where "ID" is the list item ID for the event). Event ID's are returned as just a number (for non-recurring events) or several numbers separated by ";#" in 2007 or "." in 2010 to indicate individual instances of recurring events. By splitting and joining the ID this way, thisID will be set to a valid query string parameter whether an event is recurring or not for both versions of SharePoint.
						var thisID = $( this ).attr( 'ows_ID' ).split( ';#' ).join( '.' );

						// FullCalendar documentation specifies that recurring events should all have the same id value when building the events array (the id is optional, but I'm including it for completeness). We can get the list item ID (which is the same for all instances of recurring events) without the recurrence information by simply splitting thisID.
						var eventID = thisID.split( '.' )[0];

						// Get the event title. This is displayed on the calendar along with the start time of the event.
						var thisTitle = $( this ).attr( 'ows_Title' );

						// Get the event description. I don't use it in this example, but you could use it for something, perhaps as a tooltip when hovering over the event.
						var thisDesc = $( this ).attr( 'ows_Description' );

						// Add the event information to the events array so FullCalendar can display it.
						events.push({
							title: thisTitle,
							id: eventID,
							start: thisStart,
							end: thisEnd,
							allDay: thisADE,

							// Adjust this URL to link to the display form for your calendar events. You can include a Source parameter to allow users to easily return to the FullCalendar page.
							url: '/Lists/Calendar/DispForm.aspx?ID=' + thisID + '&Source=' + window.location,
							description: thisDesc
						});

					});

					callback( events );

				}
			});

		}
	});

});
Next Steps
I still have some limitations to overcome, which I’ll focus on in a future post in this series. Unfortunately I don’t have a working demo on a public website, but I’ll try to update this post if/when I do. As always, questions, suggestions, and critiques are welcome in the comments!
Comments
heightoption when initializing FullCalendar which changes the total height of the calendar (see http://arshaw.com/fullcalendar/docs/display/height/). 2. Try adding atimeFormatoption to display nothing for the time in month view (see http://arshaw.com/fullcalendar/docs/text/timeFormat/):$( '#calendar' ).fullCalendar({ timeFormat: { month: "" } });3. I'm not sure what you mean by an overlay with several views in it. However, you can change the background color of each event by specifying either acoloroption for each event or use CSS and specify aclassNameoption for each event. You'd specify this option when looping through the events in the SPServicescompletefunc. Something like this might work (this is untested and assumes you have a "Category" field in your event form):$().SPServices({ operation: "GetListItems", async: false, listName: "Calendar", CAMLViewFields: camlFields, CAMLQuery: camlQuery, CAMLQueryOptions: camlOptions, completefunc: function( xData, Status ) { $( xData.responseXML ).find( '[nodeName="z:row"]' ).each( function() { var fADE = $( this ).attr( 'ows_fAllDayEvent' ); var thisADE = false; var thisStart; var thisEnd; if ( typeof fADE !== "undefined" && fADE !== "0" ) { thisADE = true; var thisStart = $( this ).attr( 'ows_EventDate' ); var thisEnd = $( this ).attr( 'ows_EndDate' ); } else { var thisStart = formatDateToLocal( $( this ).attr( 'ows_EventDate' ) ); var thisEnd = formatDateToLocal( $( this ).attr( 'ows_EndDate' ) ); } var thisID = $( this ).attr( 'ows_ID' ).split( ';#' ).join( '.' ); var eventID = thisID.split( '.' )[0]; var thisTitle = $( this ).attr( 'ows_Title' ); var thisDesc = $( this ).attr( 'ows_Description' ); // Get the Category for the event so we can use it as a class name var thisClass = $( this ).attr( 'ows_Category' ); events.push({ title: thisTitle, id: eventID, start: thisStart, end: thisEnd, allDay: thisADE, url: '/Lists/Calendar/DispForm.aspx?ID=' + thisID + '&Source=' + window.location, description: thisDesc, // Add the category as a class name for the event, but replace any spaces with a dash (and make sure you don't use any other illegal characters for a class name when creating categories). className: thisClass.split( ' ' ).join( '-' ); }); }); callback( events ); } });Comments are closed